Take advantage of the local, photo worthy, destinations that are right here in Southwestern Ontario. The high quality cameras on our smart phones have made photography one of the most accessible forms of art. You don't need a fancy camera to take amazing photos. To help you get started, here are six easy ways to take better outdoor photos.
Please follow posted public health guidelines at all times, wear a mask, and limit movement to your immediate area and limit contact with those outside your immediate household. Remember buying gift cards and shopping online is a great way to show your support for these local businesses while staying safe. To learn more about what you can expect from local businesses in Ontario’s Southwest, click here.
1. Settings
Depending on your phone, you may have access to different settings or camera modes. For example, if you have a newer iPhone or Android device, you can take advantage of the following settings to make your photos look professional:
-
Filters can be used to brighten, darken, or add colours to your photos. Are you taking pictures on a cold, overcast day and want to warm up the image? Use a filter that adds warming orange tones.
-
Night mode is perfect for taking photos in low light conditions. There still needs to be a light source for this mode to work. So, try using Night mode to photograph buildings, fairs, or outdoor concerts at night. Just make sure to hold your phone steady!
-
Portrait mode for iPhones, or Live Focus for Android users, is effective for blurring out the background so that your subject is the main focus of the photo.

As you can see from this adorable photo, Port Dover Beach is a great backdrop to practice taking photos using Portrait mode or Live Focus.
Do a search of your phone online and see if they have their own versions of these features.
2. Objective
When creating quality images, you’ll want to think about the scene that you are trying to capture. It is easy to miss the photobombers and other distractions hiding in the background when you are trying to quickly capture your subject. Before you miss your opportunity to get the perfect shot, take a second to think through the following:
-
Distractions can ruin a photo. Make sure that the eye goes directly to the objective of the photo and anything in the background complements the subject rather than taking the focus off your objective.
-
Where possible, look for unique angles. Taking a photo from the ground that looks up towards your subject will give the impression that your subject is very important and imperious.
-
Get closer to your subject instead of relying on zoom. Zooming in will decrease the quality of your image and is never recommended when using a cell phone to take pictures. Just make sure that you stay at least six feet away from any person that isn’t in your circle of 10.
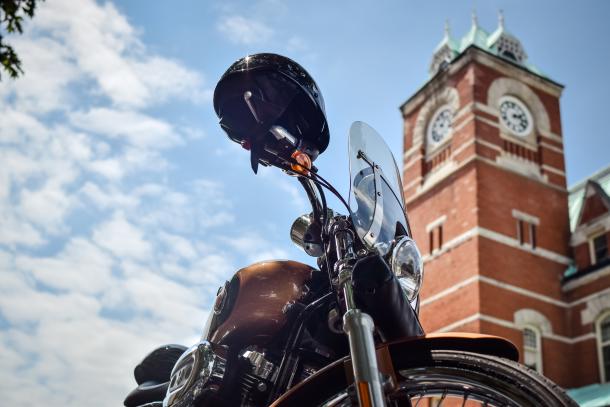
The Clock Tower Inn in Middlesex makes a great background for this motorcycle. The old clock tower is contrasted against the relative newness of the motorcycle. Therefore, the clock tower complements the subject rather than distracting the viewer from the objective. This image is also a great example of how to use both angles and distance from the subject to cut out any unsuspecting pedestrians that may be mid-yawn.
3. Timing
You will be working with very different light conditions depending on the time of day that you are shooting your photos. Here are some simple methods to use when taking photos at dusk/dawn, noon, or during golden hour:
-
Taking photos at dusk or dawn can be tricky because of the low light conditions. But luckily for you, you’ve mastered night mode and low light situations are no problem for you! Dusk and dawn are great times to take photos of people. The soft lighting allows your subject to have beautiful eye contact with the camera without squinting their eyes.
-
The opposite can be said about the harsh light of noon. This is the most difficult time of day to take photos of people. So, give your models a break, and take some scenic photos. The details and colours of a landscape will be well lit when taking photos at the sun’s highest point.
-
Golden hour is that majestic time of day when the sun creates a warm glow and makes both people and landscapes look amazing.
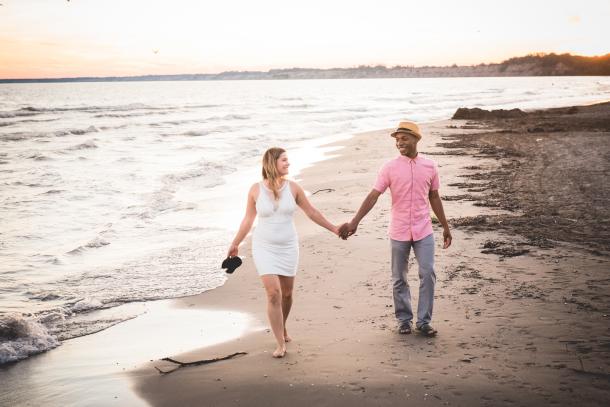
Port Stanley Beach, in the photograph above, is clearly beautiful at golden hour and would make a great setting for your next photoshoot.
4. Contrast
Understanding contrast in images can take your phone photography from “good” to “great”! Here are two main ways to think about contrast so that your subject stands out:
-
Contrast in lighting is when highlights and shadows are used to direct the focus of the photo. A forest during golden hour is the perfect place to practice contrast in lighting.
-
Contrast in colour is when you use colours to make your subject stand out. Red contrasts well with green, purple contrasts well with orange, and blue contrasts well with yellow.

The above photo from 1909 Culinary Academy is an excellent example of using contrasting lighting and colour. The bright blue sky makes a dramatic frame for the darker, orange building.
5. Positioning
Positioning your subject in the photo is another way to ensure that they stand out. The two following tricks are easy to use and will improve your photos significantly:
-
The Rule of Thirds is visualized by dividing a photo vertically into thirds and then horizontally into thirds, to create 9 equal sized boxes. The middle box is where the focal point of your photo should be most of the times. It is where the eye automatically is drawn to. This rule is not one that you always need to follow. If you do break it, make sure that you are doing so intentionally and for your own artistic reason such as putting a subject at the 1/3 or 2/3 part of your frame. You can turn the grid lines on from the setting of your phone camera.
-
Leading lines occur when there are clear lines within a photo that direct the viewer’s eye towards the target.
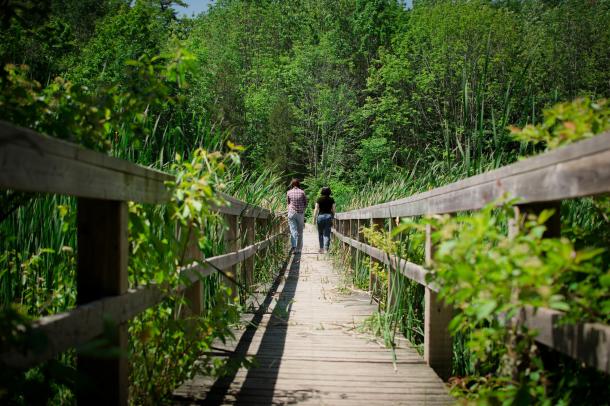
The above photo was taken in Selkirk Provincial Park and shows how the rule of thirds and leading lines can be used effectively to create a focal point. The bridge railings draw the eye to the hikers that are in the middle of the photo. Take a day trip to the Selkirk Park Loop walking trail to practice and master positioning in your photography.
6. Wander
Ontario’ Southwest is full of picture-perfect places. It is important that when you are practicing photography, that you also practice safe social distancing. When you explore your home as a local tourist, be creative and wander away from the crowds. Find new places and photograph them.
If Grand Bend beach is full of people, check out the Bittersweet Trail that makes its way across the Pinery River. Finding new places to take pictures means that you will have different and more interesting photos to show your loved ones.
When you show off your phone photography skills on Twitter, Instagram, or Facebook, use the hashtag #PlacesOfOSW so that we can see what you’ve created!
We are so lucky to have beautiful natural areas in Ontario’s Southwest to enjoy. Let’s take action to protect our precious natural spaces. Click here to join the #ForTheLoveOfParks movement and learn 5 ways you can help keep parks clean and safe.
